Easy Rose Drawing: A Beginner's Guide To Stunning Roses!
Ever felt intimidated by the prospect of drawing a rose? The truth is, creating a stunning rose drawing is within everyone's reach. This guide aims to demystify the process, offering a simple and accessible approach for beginners to create beautiful rose drawings without feeling overwhelmed. Whether you're a seasoned artist or just picking up a pencil for the first time, prepare to be empowered!
Art, at its core, is about expression. Roses, those timeless symbols of beauty and love, offer the perfect canvas for that expression. Learning to draw a rose isn't just about enhancing your artistic skills; it's about experiencing the profound satisfaction of bringing something beautiful into existence. After all, who wouldn't want to create a breathtaking piece of art?
This comprehensive guide will walk you through each step of the drawing process, breaking down complex forms into manageable components. From the initial basic shapes to the intricate details that make a rose truly captivating, we'll ensure you have the tools and knowledge to create a rose drawing you'll be proud to display. So, let's embark on this artistic journey together!
- Hdhub4u Com Your Guide To Streaming Movies Online 2024
- Inside David Muirs Wedding A Love Story You Cant Miss
| Category | Details |
|---|---|
| Subject | Drawing Roses |
| Skill Level | Beginner to Intermediate |
| Tools Required | Pencils, Eraser, Sketchbook |
| Primary Focus | Simplifying the rose drawing process |
| Website Reference | Drawing For All - How to Draw a Rose |
Drawing a rose is akin to crafting a miniature masterpiece. These flowers, steeped in centuries of symbolism representing beauty, love, and passion, are an eternally captivating subject for artists. However, their seemingly complex structure often deters beginners. The key lies in simplification. By breaking down the rose into manageable steps, drawing one becomes not only easier but deeply rewarding.
There's an undeniable magic in witnessing a blank piece of paper transform into a vibrant, lifelike rose. It's an act of creation, of breathing life into your imagination. And let's be honest, who wouldn't relish the opportunity to impress friends and family with a stunning, hand-drawn rose?
Roses possess an undeniable allure, perfectly capturing the essence of artistic expression. Their versatility lends itself to endless experimentation with styles, colors, and techniques. Whether you gravitate towards realism, minimalism, or even the abstract, roses provide a boundless arena for unleashing your creativity.
- Future Filmmaking In 2025 New Rules Amp Trends You Need To Know
- Kannada Cinema Buzz Movierulz Kannada Movies 20242025 Latest Scoop
Before diving into the drawing process, let's gather the essential tools. There's no need to invest in expensive equipment at this stage. Here's a straightforward list to get you started:
- Pencils (HB, 2B, 4B)
- Eraser (kneaded and regular)
- Sketchbook or drawing paper
- Blending tools (optional)
These fundamental tools will enable you to create a beautiful rose drawing without straining your budget. As you progress and refine your skills, you can explore a wider range of advanced materials tailored to your evolving artistic preferences.
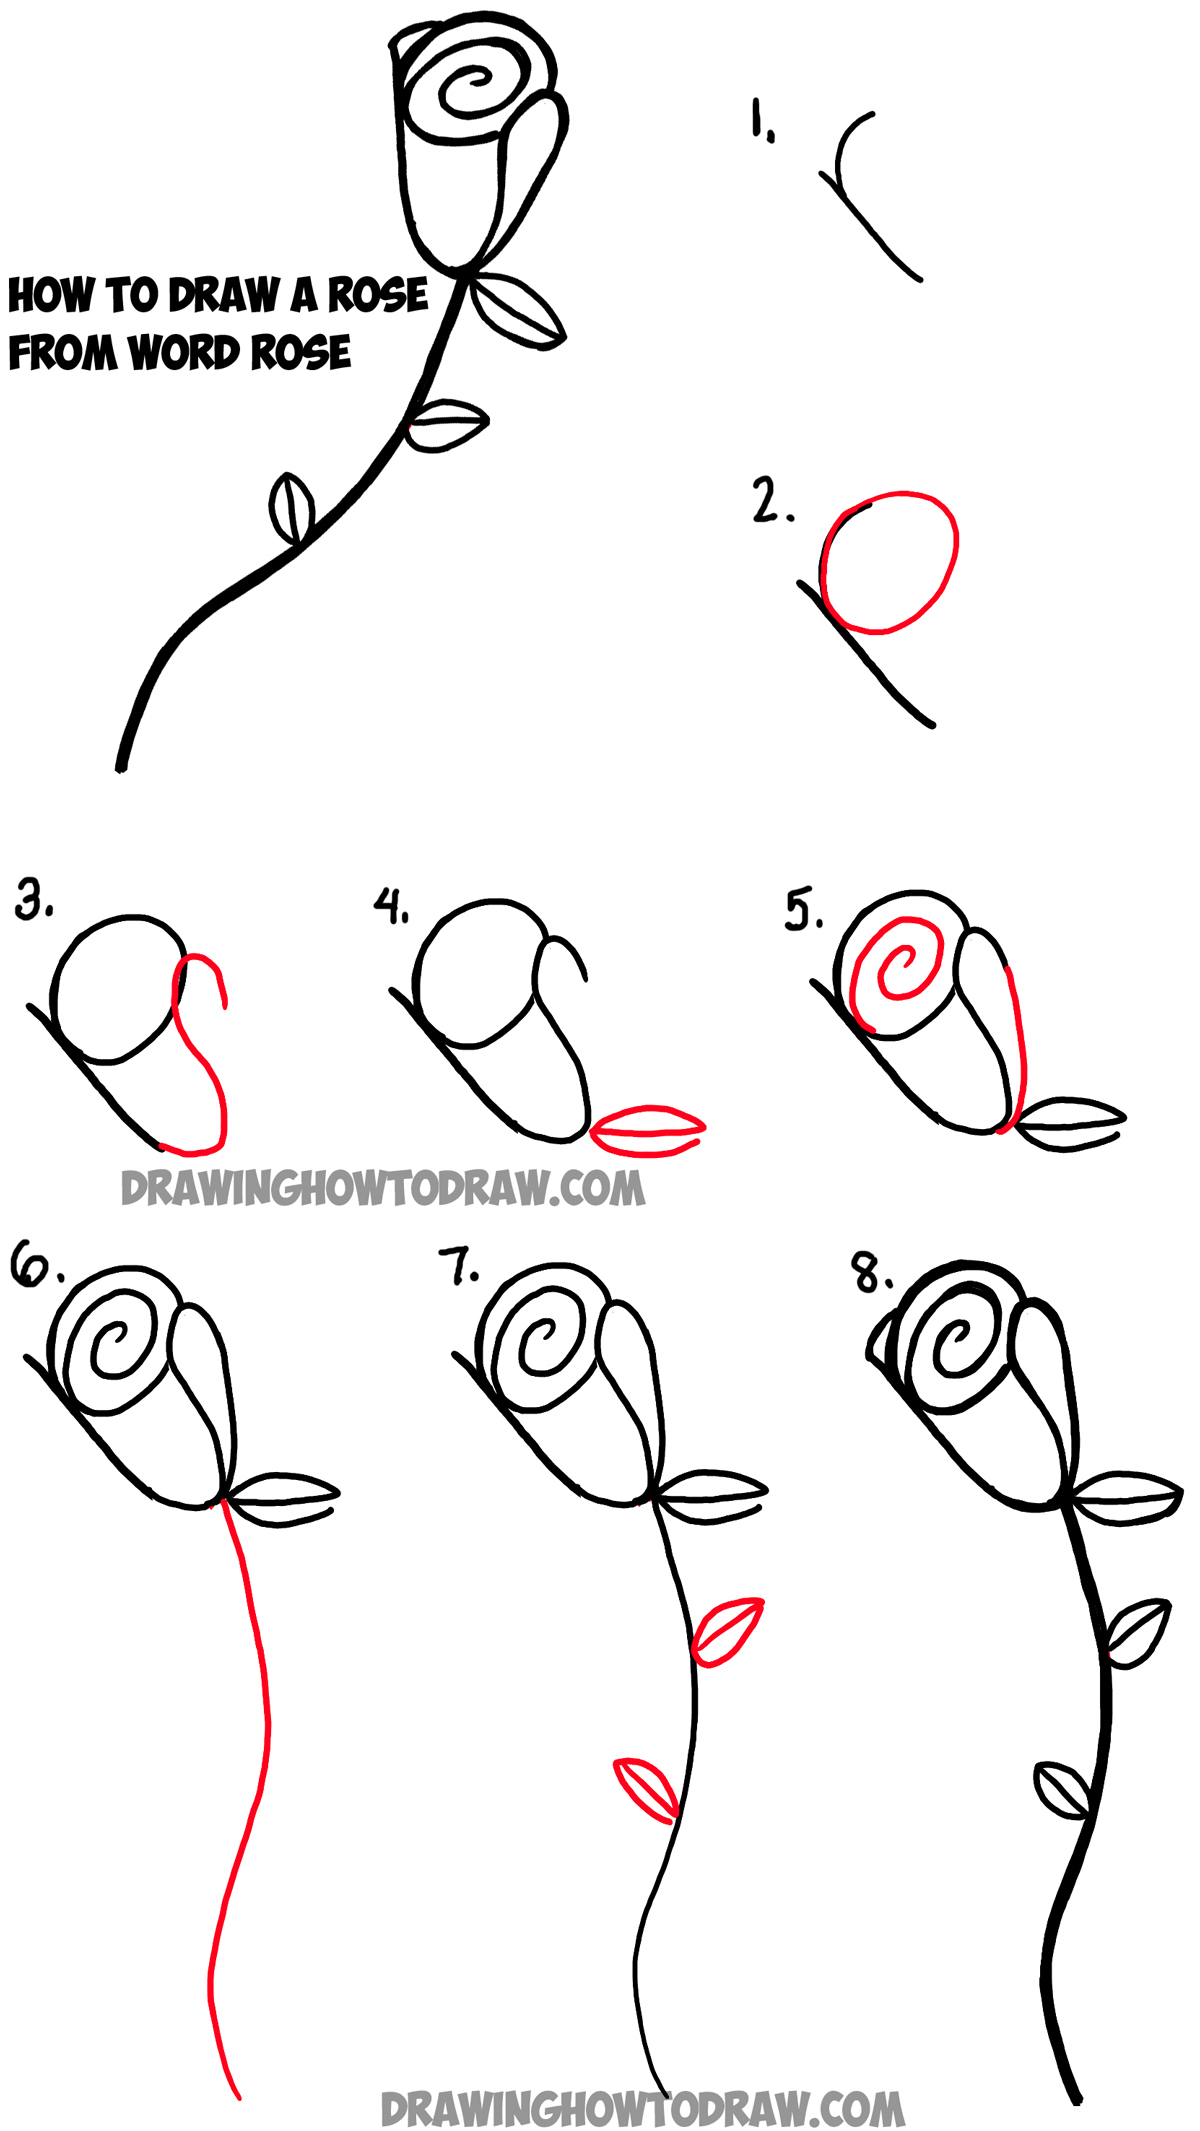
One of the most effective approaches to drawing a rose is to deconstruct it into simple, fundamental shapes. This method makes the process less daunting and more approachable. Here's how to begin:
Start with a small circle to represent the central core of the rose. Then, surround it with oval shapes to define the inner petals. Gradually build up the layers, making each successive petal slightly larger than the preceding one. This technique helps create the illusion of depth and realism, mimicking the natural form of a blooming rose.
Roses possess a distinctive structure, characterized by multiple layers of overlapping petals. By concentrating on the basic shapes initially, you ensure that your drawing maintains accurate proportions from the outset. This foundational approach is crucial for creating depth and dimension, aspects we'll delve into further in the shading section.
Now that we've established the fundamentals, let's move on to a step-by-step guide for drawing a stunning rose. Follow these instructions carefully, and prepare to be amazed by the results you can achieve:
Step 1: Begin by sketching a small circle to define the center of the rose.
Step 2: Add several oval shapes around the circle, carefully shaping them to form the innermost petals.
Step 3: Gradually expand outward, adding more petals that become slightly larger with each successive layer.
Step 4: Use simple, flowing lines to sketch the stem and leaves, capturing their basic shapes and orientation.
Step 5: Refine your initial sketch by erasing any unnecessary guidelines, leaving a clean and defined outline.
By diligently following these steps, you'll establish a solid foundation for your rose drawing. Remember, consistent practice is the key to achieving mastery!
Here are some professional tips to elevate your rose drawing to the next level:
- Observe real roses closely to gain a deeper understanding of their intricate structure and unique characteristics.
- Experiment with different pencil strokes to introduce texture and create visual interest.
- Don't be discouraged by mistakes; they are an inevitable part of the learning process and valuable opportunities for growth.
Once you've established the basic structure of your rose, it's time to infuse it with details that will truly bring it to life. Pay close attention to the curves and folds of the petals, the delicate veins on the leaves, and the textured surface of the stem. These seemingly minor details contribute significantly to the overall realism and appeal of your drawing.
Use a sharp pencil to meticulously define the edges of the petals, adding subtle lines to mimic the natural texture of a rose. You can also explore various shading techniques to further enhance the realism of your drawing, capturing the interplay of light and shadow.
Texture is paramount in creating a realistic drawing. To add texture to your rose, experiment with techniques such as cross-hatching, stippling, or blending. These methods create the illusion of depth and dimension, transforming your drawing into a more lifelike representation of a rose.
Shading is arguably one of the most critical aspects of drawing, as it imbues your rose with depth and dimension, making it appear to leap off the page. Here are a few shading techniques to explore:
- Hatching: Use parallel lines, closely spaced or further apart, to create varying degrees of shading.
- Cross-hatching: Layer lines in different directions to achieve a more complex and nuanced shading effect.
- Stippling: Use dots, varying in density, to create shading and texture, adding a unique visual quality.
Experiment with these techniques to discover which best suits your artistic style and the desired effect. Remember, consistent practice is essential for mastering the art of shading!
A fundamental understanding of light and shadow is crucial for adding depth to your drawing. Carefully observe how light interacts with the rose, noting where highlights and shadows fall. Use this knowledge to enhance your shading, creating a more realistic and three-dimensional representation. For instance, if the light source originates from the left, the right side of the rose will naturally exhibit shadows.
Even seasoned artists began as beginners, and making mistakes is an inherent part of the learning process. Here are some common pitfalls to be aware of and strategies for avoiding them:
- Overworking the Drawing: Sometimes, simplicity is key. Avoid overwhelming the drawing with excessive details too early in the process.
- Ignoring Proportions: Ensure accurate proportions by starting with basic shapes, establishing a solid foundation from the outset.
- Forgetting the Background: The background can significantly enhance your drawing, providing context and visual interest. Don't neglect it!
By recognizing these common mistakes, you can proactively improve your skills and create increasingly compelling drawings over time.
Mistakes are invaluable opportunities for learning and growth. Instead of becoming discouraged, embrace them as stepping stones on your path to becoming a more accomplished artist. Each mistake brings you one step closer to mastering the art of drawing roses, refining your technique and expanding your artistic vision.
Art is fueled by inspiration, and drawing roses is no exception. Seek inspiration from the world around you. Visit botanical gardens, explore art galleries, or browse social media for stunning rose drawings. The more you expose yourself to diverse styles and techniques, the more inspiration you'll glean for your own artistic endeavors.
Don't hesitate to experiment with different approaches. You might stumble upon a new technique or style that resonates with you, shaping your artistic voice in unexpected and exciting ways.
Here are some excellent resources for discovering inspiration for your rose art:
- Art books and magazines
- Online art communities
- Direct observation of nature and real-life settings
Consistent practice is the cornerstone of improvement. The more you draw, the more refined your skills will become. Here are some tips to help you practice effectively:
- Dedicate a specific time each day for drawing, establishing a consistent routine.
- Challenge yourself with new techniques and styles, pushing your boundaries and expanding your artistic repertoire.
- Participate in online art communities to share your work, receive constructive feedback, and connect with fellow artists.
Remember, consistency is paramount. Even if you can only spare a few minutes each day, make the most of that time to practice and hone your skills. Every stroke, every sketch, contributes to your overall progress.
Maintain a sketchbook to meticulously track your progress. Regularly review your earlier drawings to witness how far you've come. Seeing tangible evidence of your improvement is incredibly motivating, fueling your passion and inspiring you to continue practicing and growing as an artist.
- Hikaru Nagi Sone 436 The Latest Scoop Whats Next
- Breaking The Maligoshik Onlyfans Leak What You Need To Know
Rose Drawing Steps Beginners at Explore collection
Rose Drawing Easy at Explore collection of Rose

Easy Rose Drawing Tutorial at GetDrawings Free download
